Intro
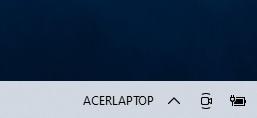
I have a unique situation that caused me to search out a simple and quick way to display PC name in the Windows 10 taskbar. I actually discovered two. Neither are a perfect solution but they work.
The Reason I Wanted To Display PC Names In The Windows 10 Taskbar
I have a pretty crazy desk setup that includes 3 monitors and 4 PC’s. I wanted a label, preferably in the taskbar, that will always tell me which Windows 10 device is being displayed on my monitors.
Method 1: How To Display A PC Name In The Windows 10 Taskbar
Description
One method is to use the toolbars feature of the Windows 10 taskbar. This is the more elegant looking solution although it comes with a caveat.

The good – Looks very clean. Doesn’t disturb anything else.
The bad – Only works on the primary monitor.
I really like the simple look of this. It’s a shame toolbars are only allowed on the primary monitor. When you use additional monitors to extend your desktop you will see no taskbar option to display toolbars on the additional monitors.
Directions
- Create a new folder with the name you want to display in your Windows 10 taskbar. It can be located anywhere on your PC, for example – c:\windows\ACERLAPTOP.
- Right click on any blank area of the taskbar. Then highlight toolbars and click on new toolbar.
- Now you will navigate to the location on your PC where you created the new folder. In my case it was c:\windows\ACERLAPTOP. Highlight the folder and click on the select folder button
- You will now see the folder name appear in your taskbar.
Method 2: How To Display a PC Name In The Windows 10 Taskbar
Description
Modifying the regional settings for the AM and PM symbols gives us the opportunity to add a note that is always shown in the taskbar. This displays the PC name in the Windows 10 taskbar on all monitors like below.

This is great for people that need to view multiple computers on the same monitor with a KVM or even who RDP into remote machines. A quick glance to the taskbar and you will be certain what device you are connected to.
The good – Displays on all monitors.
The bad – Time formats in other places will also be affected, including the display of file dates and time in Windows Explorer windows. Not as elegant looking.
Directions
- Click on the start menu.
- Type control panel and press enter.
- In the search bar of the control panel window type “region.” In the results click on “Change date, time, or number formats.”
- At the bottom of the window click on “additional settings.”
- Click the “time” tab.
- Append your label in the AM symbol and PM symbol fields. See below for an example.
- You will now see your computer name label next to the time.

Note: Numerical characters (0-9) are not permitted in these fields. If you were planning on using PC1, PC2 (etc.) you might want to use PC A, PC B (etc.) instead. Also the character length is limited so you may need to abbreviate.
Conclusion
Honestly both of these have some big caveats that are annoying. One solution only works on the primary monitor and the other solution makes dates and times ugly in other places such as Windows Explorer. I have yet to come up with a better solution for Windows 10. If you know of a better answer please let me know in the comments.